Screensharing a Mac using Switcher Cast
Switcher Cast is a free screensharing program that allows you to use a computer display as an Input in your Switcher Studio production. Many customers use Switcher Cast to share things like Powerpoint and Google Slides presentations, webpages, and displays from other programs.
Before installing Switcher Cast, there are some important things to note:
-
Screensharing from your computer does not transmit audio. To include audio from your computer, you will need to use an audio mixer with your production.
-
Your computer must be on the same WiFi network as the iOS/OS devices you're using for Switcher Studio.
-
For best results, we recommend setting your computer's screen resolution to 1920x1080.
There are three basic steps to using Switcher Cast to screenshare into Switcher Studio:
-
Install Switcher Cast on your compatible Mac (one-time process).
-
Open Switcher Cast on your Mac.
-
From the Switcher Studio app, select the Mac screen or camera that you want to use in the production.
Jump to:
Video Tutorial: How to Screenshare from a Mac into Switcher Studio
Mac Compatibility
Switcher Cast is compatible with the following Macs running the most recent OS:
-
Mac Pro: Mid 2010 or newer
-
Mac Mini: Mid 2010 or newer
-
MacBook Air: Late 2010 or newer
-
MacBook Pro: Mid 2010 or newer
-
MacBook and MacBook Retina: Late 2009 or newer
-
iMac: Late 2009 or newer
Note: Mac Minis do not have a built-in webcam. For Switcher Cast to work properly on these computers, an external webcam or software such as Camo must be used instead.
Installing Switcher Cast on your Mac
To install Switcher Cast on your Mac:
-
Log into the Switcher Studio Dashboard using the same email and password as the app.
-
Click App Center in the left menu.
-
Under Switcher Cast Desktop App, click Download for Mac.

-
Click the View in Mac App Store option.
-
Click Get to install (or the cloud icon if you've previously downloaded it).

-
To use Switcher Cast right away, click Open.
Bringing in your Mac as an Input Source in Switcher Studio
Opening Switcher Cast on your Mac
-
Launch Switcher Cast from your Applications folder or Spotlight Search (command + spacebar).
-
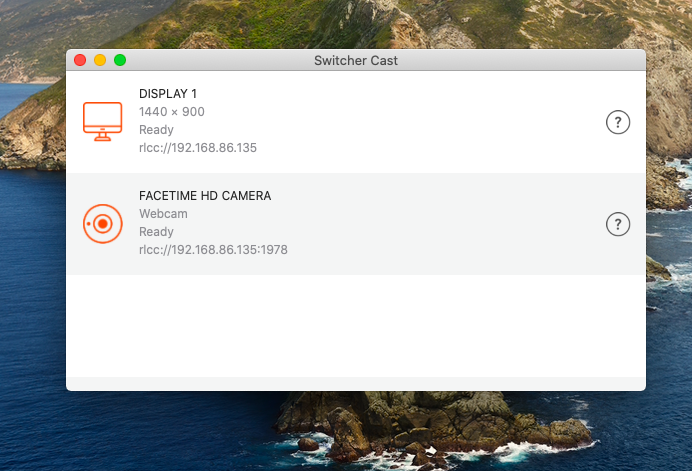
Your Mac's main display and built-in camera (FaceTime HD) will be listed visible, as well as any connected displays.
Note: You must keep Switcher Cast open while using it with the Switcher Studio app.
Using your Mac screen as an Input source in Switcher Studio
-
Open the Switcher Studio iOS app on the device you're using as the switcher.
-
Tap the Inputs tab (camera icon in lower tab bar).
-
Under Sources on Your WiFi Network, you should see your Mac's camera and display(s).
-
Tap the display name to enable it as an Input source in your production. Once enabled, a blue checkmark will appear next to it, and it will show up in your Sources / Production panel.
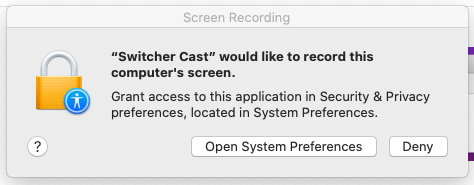
Note: The first time you use Switcher Cast, you'll receive a message on your Mac about granting access for screen recording. Click "Open System Preferences." If you accidentally click Deny, simply go to your System Preferences manually.
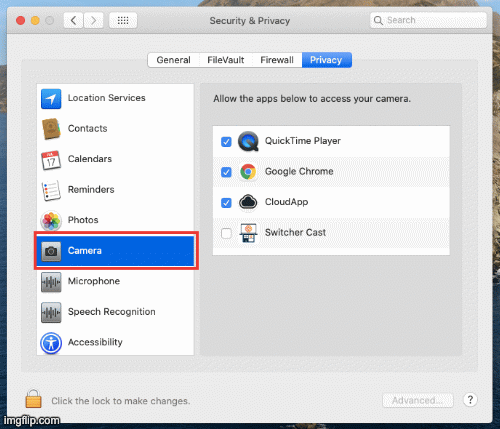
In System Preferences, go to Privacy > Screen Recording, and check the box next to Switcher Cast as shown below.

Using your Mac webcam as an Input source in Switcher Studio
The process for using your webcam is the same as it is to screenshare the display. However, you need to allow Camera permissions for Switcher Cast in the Security & Privacy settings on your Mac:
-
Open System Preferences.
-
Click Security & Privacy.
-
Click Camera in the left menu.
-
Check the box next to Switcher Studio.
Once you have enabled camera permissions, you can bring the webcam into Switcher Studio as follows:
-
Open the Switcher Studio iOS app on the device you're using as the switcher.
-
Tap the Inputs tab (camera icon in lower tab bar).
-
Under Sources on Your WiFi Network, you should see your Mac's camera.
-
Tap the camera name to enable it as an Input source in your production. Once enabled, a blue checkmark will appear next to it, and it will show up in your Sources / Production panel.
Related articles: